I figured a nice planner would do the trick and was a sensable first step to acheiving organization. But then it hit me, I am not going to spend a bagillion dollars for a nice planner...remember, I am frugal and the idea of spending (did I say a bagillion?) money on a planner was not on my priority list. But, I did resolve to become more organized. What was this frugal, unorganized chic to do?
It was time to get creative! Don't you find that one of the most fun things about being frugal is that you get to test your creativity frequently?! And when you succeed, it is just as rewarding (or maybe even more so) as saving 50-75% or more at the store with your coupons!
So here's what I did....
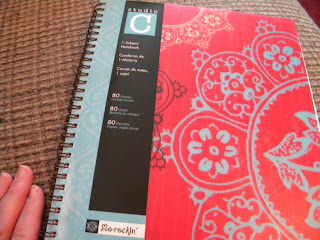
Remember the Carolina Pad free notebook deal I told you about here? Well, I dug my free notebook out along with a few other supplies and this is what I came up with.
I can also write out a to-do list or additional information to what I have written on the monthly at a glance pages here.
Plus, for those pages I get from Preschool, birthday invites, directions to an appointment or whatever miscellaneous papers I get for a month I can easily paper clip them to the back of the monthly calendar page. They are readily available and easy to find (uh-em, the goal was to get organized right!) :-)
Okay, so it may not be the most impressive do-it-yourself project but it is one that I feel so incredibly good about. I used things I already had around the house, PLUS I am still doing good working towards my resolution! Am I organized? No. But I am certainly getting there.
Want to do this yourslef?
What you will need:
*Find a notebook you want to use, this can be any notebook really. Even the $.15 back to school notebooks! (You could dress up the cover with a fun picture of your family or kiddos and then place a laminate sheet over it to protect it!)
*12 separate sheeets of paper to designate one for each of the months
*Markers/Crayons
*Calendar template (I used Microsoft Word)
*Paperclips 2-3
*Tabs (I will be adding tabs to mark the monthly pages, definitely optional)
*Double sided tape
What to do:
*Use your calendar template to print off the 12 months of the year, one per sheet.
*Place 'January' on the first page of the notebook with double sided tape.
*On the next page, draw out sections for each day of the month and add the date. I have 5 days per sheet in mine. I simply drew them out with markers using the lines as my guide.
*Place 'February' on the next page following the sectioned out days of the month for January.
*On the next page, draw out sections for each day of the month.
*Repeat until you have gone through the whole year.
*Add a paper clip to a few of the monthly pages so that they are available for adding stuff as you get it.
*Add tabs to mark out the months, if you choose to add these.
*Enjoy!
What about you? What tips do you have for getting organized on a budget? How have you expressed your creativity lately?


We have a big family but little space for storage. I've always wanted a shelving unit in the bathroom. Well, I'm a member of a group on yahoo called FreeCycle. A group that is frugal but mostly it's for keeping things out of the landfill. What is one person's trash, could be another one's treasure. So, I just posted that I was interested in finding an over-the-toilet shelving unit. I waited less than 48 hrs when someone contacted me saying they had one that was just too big for their small bathroom and that I may have it if I'd like.
ReplyDeleteI brought it home. It needed some cleaning. It was also missing a door handle. So, for less than $3 I was able to find some new handles for it which put my own little touch to it. Tah-da. a bathroom storage solution. It organizes my towels better. gives me a better place for toilet paper stock, etc.
Oh, another way I was able to organize in my kitchen...we use a lot of zip lock containers. We have circles and squares both. At one time, I was just stacking the lids together and then placing the correct shape bowl on top of the stack of lids...quite cumbersome when it came to needing one of those lids, right? yes. Not only that but I found myself just throwing the lids in there and saying the heck w/it most days...oh, what a mess that would become.
ReplyDeleteSo, I found some larger plastic bowls that I wasn't really using much. Just so happened that one was a rounded corners square and the other a circle and just about the perfect size to hold my lids!
I put the circle lids under the square cause the square lids do have to slant up a bit, as it's just a tad too small to have them lay flat.
but, perfect! I was so please w/myself and all it cost me was the thought and about 3-4 minutes to put it into action
Love them! Thanks for sharing!
ReplyDelete